使用環境
- MacBook Pro M3 pro
- Python3
- IDE 是 PyCharm (快捷鍵可以使用
⌃R可以執行我們撰寫的python程式)
前言
網頁爬蟲常需要爬取多頁資料,本文介紹兩種常見的換頁方式:
- 網址的參數
- 抓下一頁的HTML元素網址
1. 網址的參數
第一種觀察下網址,通常會有參數可以標示是哪一頁,以下以 iT 邦幫忙 技術文章 為例。
import requests
from bs4 import BeautifulSoup

# 寫上 瀏覽器的 User-Agent
headers = {
    'User-Agent': 'Mozilla/5.0 (Macintosh; Intel Mac OS X 10_15_7) AppleWebKit/537.36 (KHTML, like Gecko) Chrome/126.0.0.0 Safari/537.36'
}

for page in range(1, 11):

    html_code = requests.get(f"https://ithelp.ithome.com.tw/articles?tab=tech&page={page}", headers=headers).text
    soup = BeautifulSoup(html_code, "lxml")

    article_tags = soup.find_all('div', class_='qa-list')

    print(f"Page: {page}")

    for article_tag in article_tags:
        title_tag = article_tag.find('a', class_='qa-list__title-link')
        print(title_tag.text, title_tag['href'])

    print("--------------")
2. 抓下一頁的HTML元素網址
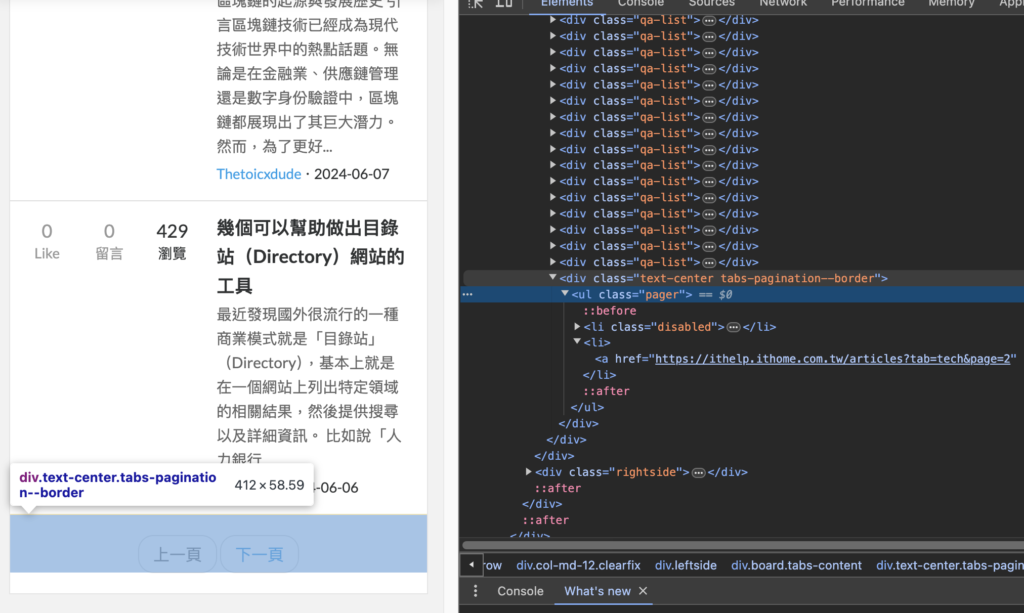
此方式通過分析HTML結構找到下一頁的連結。如下圖所示,我會找到 class 名稱為 tabs-pagination--border 的區塊,並提取其中 rel="next" 的連結

範例如下:
import requests
from bs4 import BeautifulSoup

# 預計要抓第幾頁
current_page = 1
end_page = 10

current_url = "https://ithelp.ithome.com.tw/articles?tab=tech"

headers = {
    'User-Agent': 'Mozilla/5.0 (Macintosh; Intel Mac OS X 10_15_7) AppleWebKit/537.36 (KHTML, like Gecko) Chrome/126.0.0.0 Safari/537.36'
}

while current_page <= end_page:
    # 第一頁網址
    html_code = requests.get(current_url, headers=headers).text
    soup = BeautifulSoup(html_code, "lxml")

    article_tags = soup.find_all('div', class_='qa-list')

    print(f"Page: {current_page}")

    for article_tag in article_tags:
        title_tag = article_tag.find('a', class_='qa-list__title-link')
        print(title_tag.text, title_tag['href'])

    current_page = current_page + 1

    print("--------------")

    # 找到分頁功能的區塊
    pagination = soup.select_one('.tabs-pagination--border')
    next_page_tag = pagination.select_one('a[rel=next]')

    if not next_page_tag:
        break

    current_url = next_page_tag['href']
結語
以上分享如何在網站上進行多頁爬蟲。再次提醒大家,爬蟲主要目的是收集自己需要的資料,請遵守相關網站的規範。
